Improvised stripey hats: a rough guide.

If you follow me on Instagram, you probably know that I’m on a bit of a stripey hat kick. I find these hats to be just the right combination of mindless knitting and creative play: they use up all kinds of leftovers and little skeins, and I get to play around with colour without worrying whether it’ll look good in sample photos or the stripes are perfect or the colours are maybe a bit weird.

Continue reading

Tutorial: Judy’s Magic Cast On

This is my usual cast on for toe up socks and slippers. I came across it years ago in Wendy D. Johnson’s book Toe Up Socks for Every Body, and it worked well for me, so I’ve stuck with it. I’m not going to tell you it’s the Best Cast On Ever, or even that it’s better or worse than any other toe up cast on out there, just that it works well for me and I kind of like the flippy motions of slinging the yarn around the needles like a very minimalist Cat’s Cradle. It’s the cast on I used in the Last Minute Travel Slippers, and I included this tutorial in the pattern.  Here’s how you do it:

Note: This tutorial shows 2 circular needles. If you usually do your socks with Magic Loop or DPNs, do feel free to use your preferred needles. Obviously there’s no cord on DPNs, so if you’re using those you won’t be pulling your needles out to work the first round.
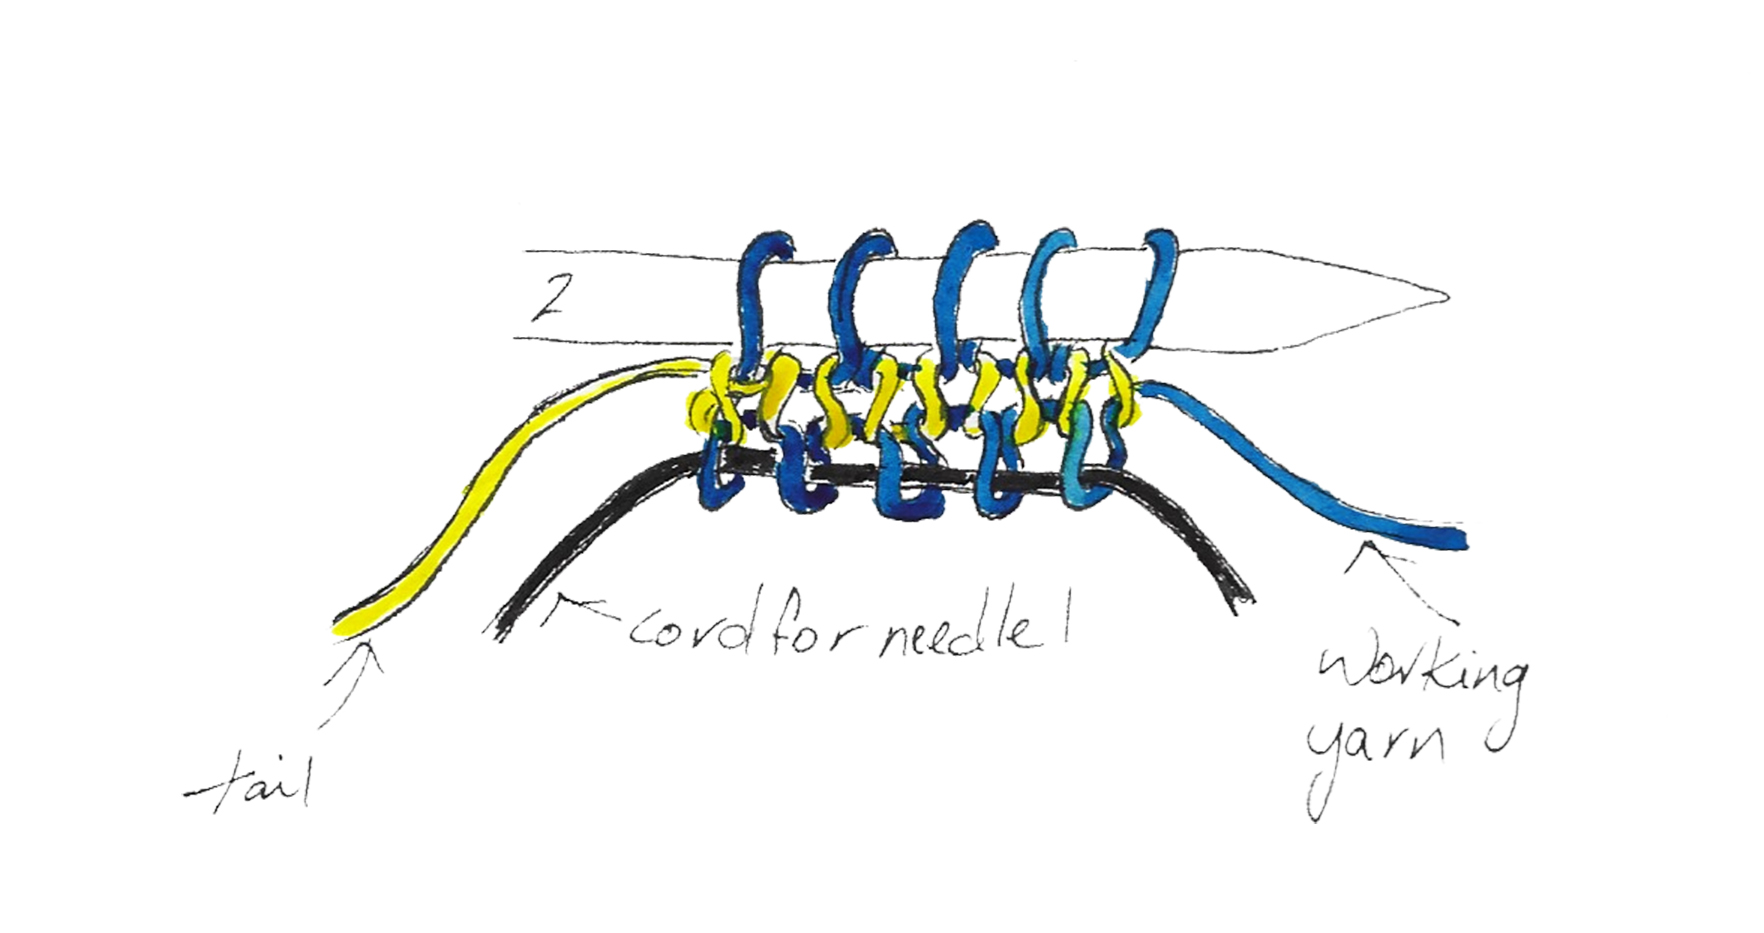
Step 1

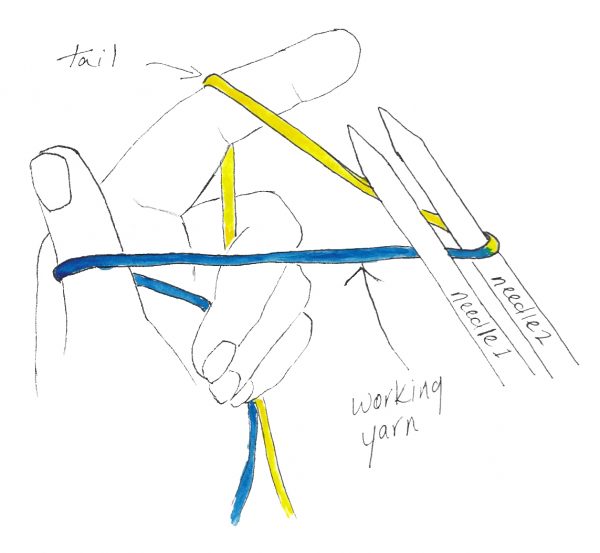
Take one tip from each of two circular needles. Hold the tips together, one (needle 1) below the other (needle 2). Arrange yarn so that the tail comes up over your index finger, over needle 2, between the needles, around your thumb from the outside, and from there over your palm to the ball of yarn. Use your other three fingers to hold the yarn ends firmly.

Step 2

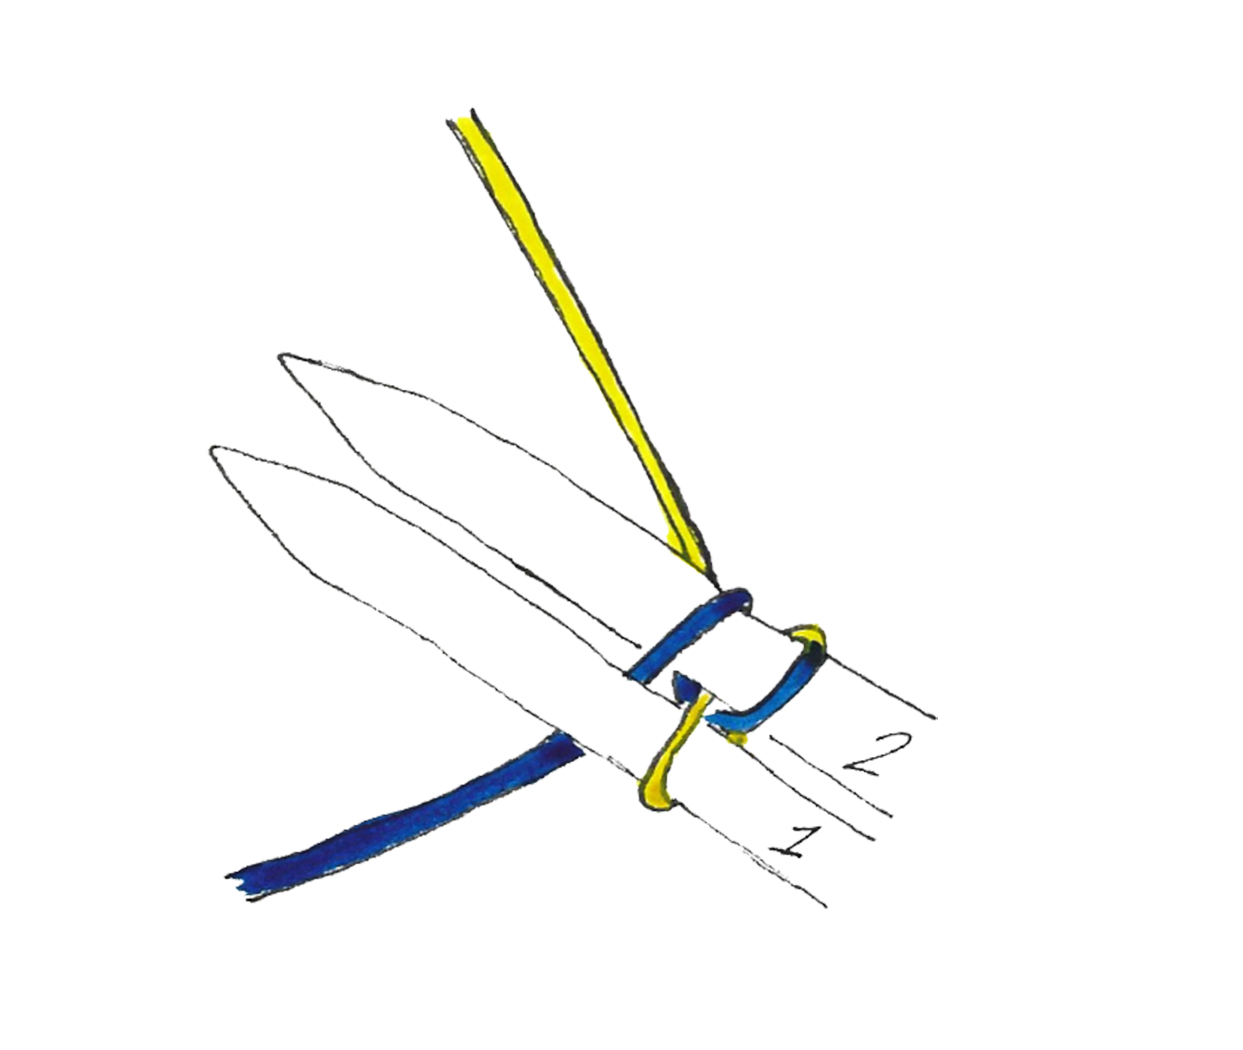
With your index finger, bring the tail behind needle 1, up around the front, and between the needles.

Step 3

With your thumb, bring the working yarn behind and over needle 2, then back between the needles.

Step 4

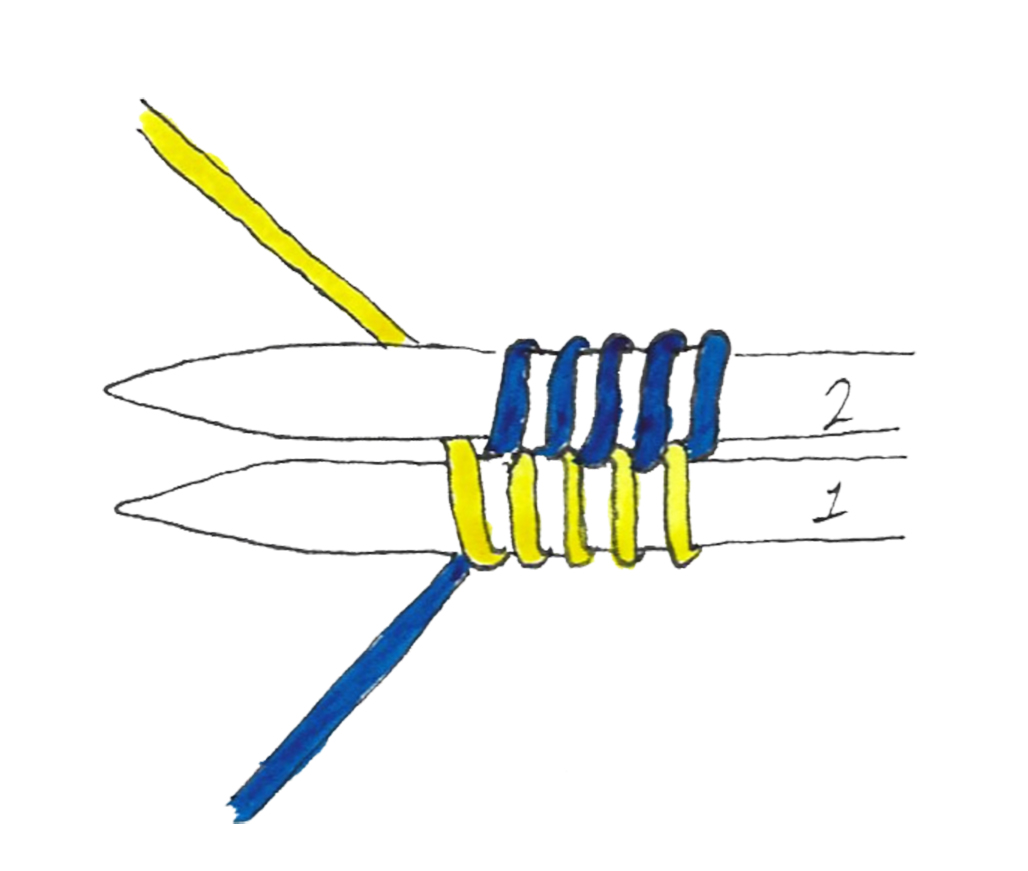
Repeat steps 2 and 3 until you have cast on the desired number of stitches, ending with step 2.

First Round

I usually place my marker after finishing this round.

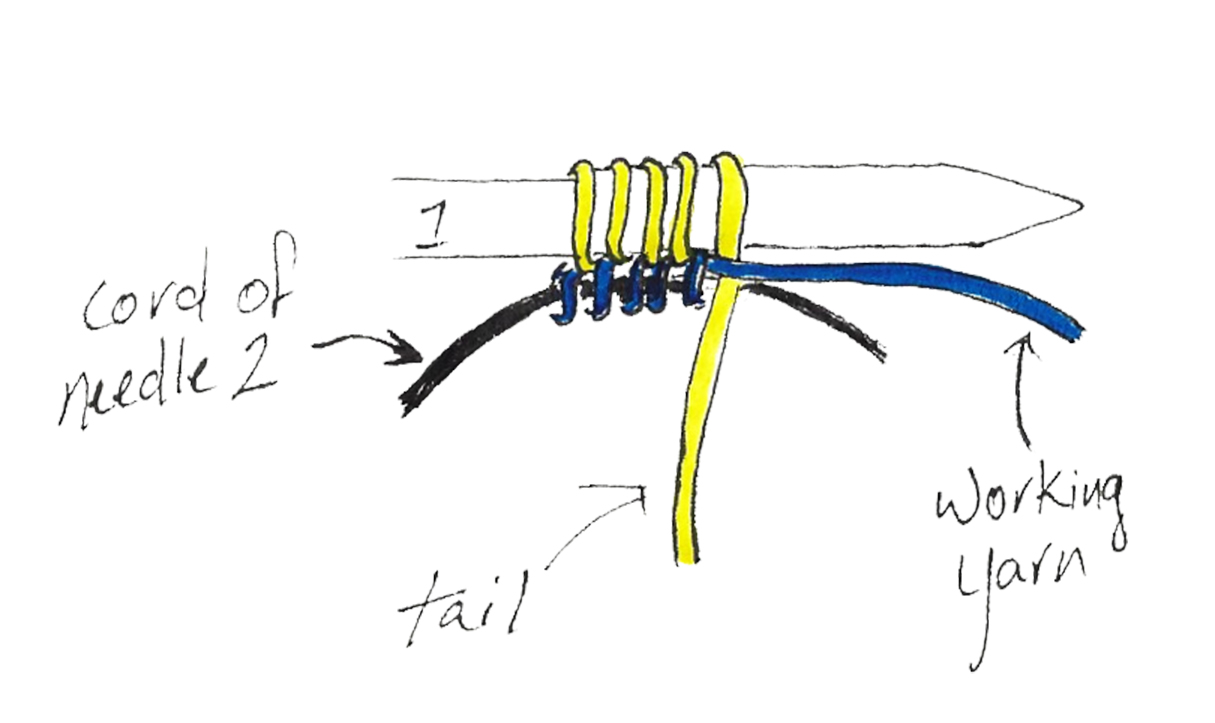
Turn needles over so that needle 1 is on the top and the tips are pointing to your right. Pull the tip of needle 2 to the right so that the bottom stitches are on the cord. Make sure the tail is between the working yarn and needle 1. 

Knit all stitches on needle 1.

Turn needles so that needle 2 is on the top. Pull needle 1 to the right so that its stitches are on the cord, then pull needle 2 to the left so that its stitches are on the needle tip, with the tip pointed to your right.

All the stitches on needle 2 except the first one will be seated backward, so knit the first stitch, then knit the rest of the stitches on needle 2 through the back of the loop.

And that’s it! This cast on is nicely invisible, looking rather like the grafted toe on a cuff-down sock.

The Last Minute Travel Slippers, using Judy’s Magic Cast On. Photo by Gale Zucker.

Tubular Cast On: my current favourite method

I do adore the tubular cast on. It’s tidy, and stretchy, and in fine gauge yarns before some ribbing it looks positively professional. It’s particularly helpful when you want to get a stretchy rib from a yarn without much memory of its own, which is why it’s the key to a good brim in Slouch 1, 2, and 3.

Slouch 1 three quarters web
Slouch 1: The first half of the brim is worked in Shibui Knits Pebble held double. Pebble is not a bouncy yarn at all, yet see how nicely the tubular cast on stretches?

I’ve tried several different tubular cast on methods; this is the one I currently prefer. I won’t say it’s the Best Method Ever—that’s subjective, and I’m fickle. It’s the one I used for these samples, and it worked well for me. Here’s how you do it: Continue reading

Tutorial: The Emily Ocker Cast On

It’s been ages since the last tutorial, hasn’t it? Time to fix that. With a new centre-out design coming out in the fall and the release of a revised version of the Sweet Lullaby Seamless Hooded Baby Blanket, now’s a good time to demonstrate a useful cast on for projects worked from the centre: the Emily Ocker cast on. This is the cast on that I go to for centre-out work, as I find it fairly easy to do, and a simple tug on the tail closes the hole left in the middle of your work. Continue reading

Mawata Colossus: the Peephole block

Being part 3 of a series of tutorials for the Mawata Colossus project. The first part explains how to knit with mawata or silk hankies, and the second gives a recipe for the Picture Window block. Because mawata don’t come in a standard yarn weight and you may have your own preferences for the gauge and size of your blocks, these posts describe how I make the blocks and give guidelines on making your own. They’re more sort of recipes, rather than proper tested, tech edited patterns. Continue reading