
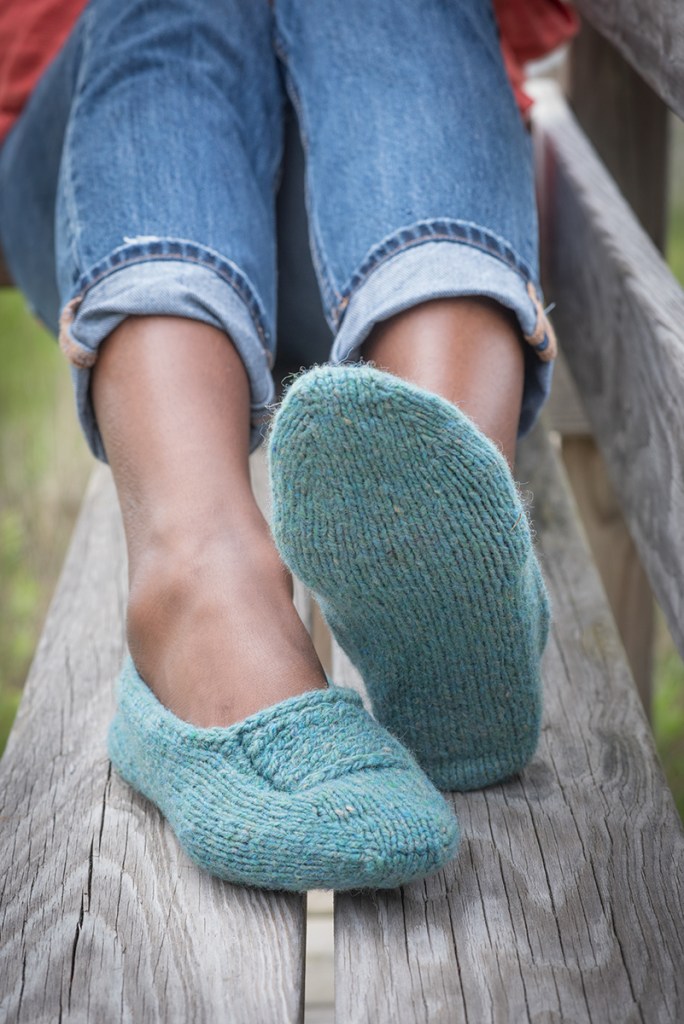
This is my usual cast on for toe up socks and slippers. I came across it years ago in Wendy D. Johnson’s book Toe Up Socks for Every Body, and it worked well for me, so I’ve stuck with it. I’m not going to tell you it’s the Best Cast On Ever, or even that it’s better or worse than any other toe up cast on out there, just that it works well for me and I kind of like the flippy motions of slinging the yarn around the needles like a very minimalist Cat’s Cradle. It’s the cast on I used in the Last Minute Travel Slippers, and I included this tutorial in the pattern. Here’s how you do it:
Note: This tutorial shows 2 circular needles. If you usually do your socks with Magic Loop or DPNs, do feel free to use your preferred needles. Obviously there’s no cord on DPNs, so if you’re using those you won’t be pulling your needles out to work the first round.
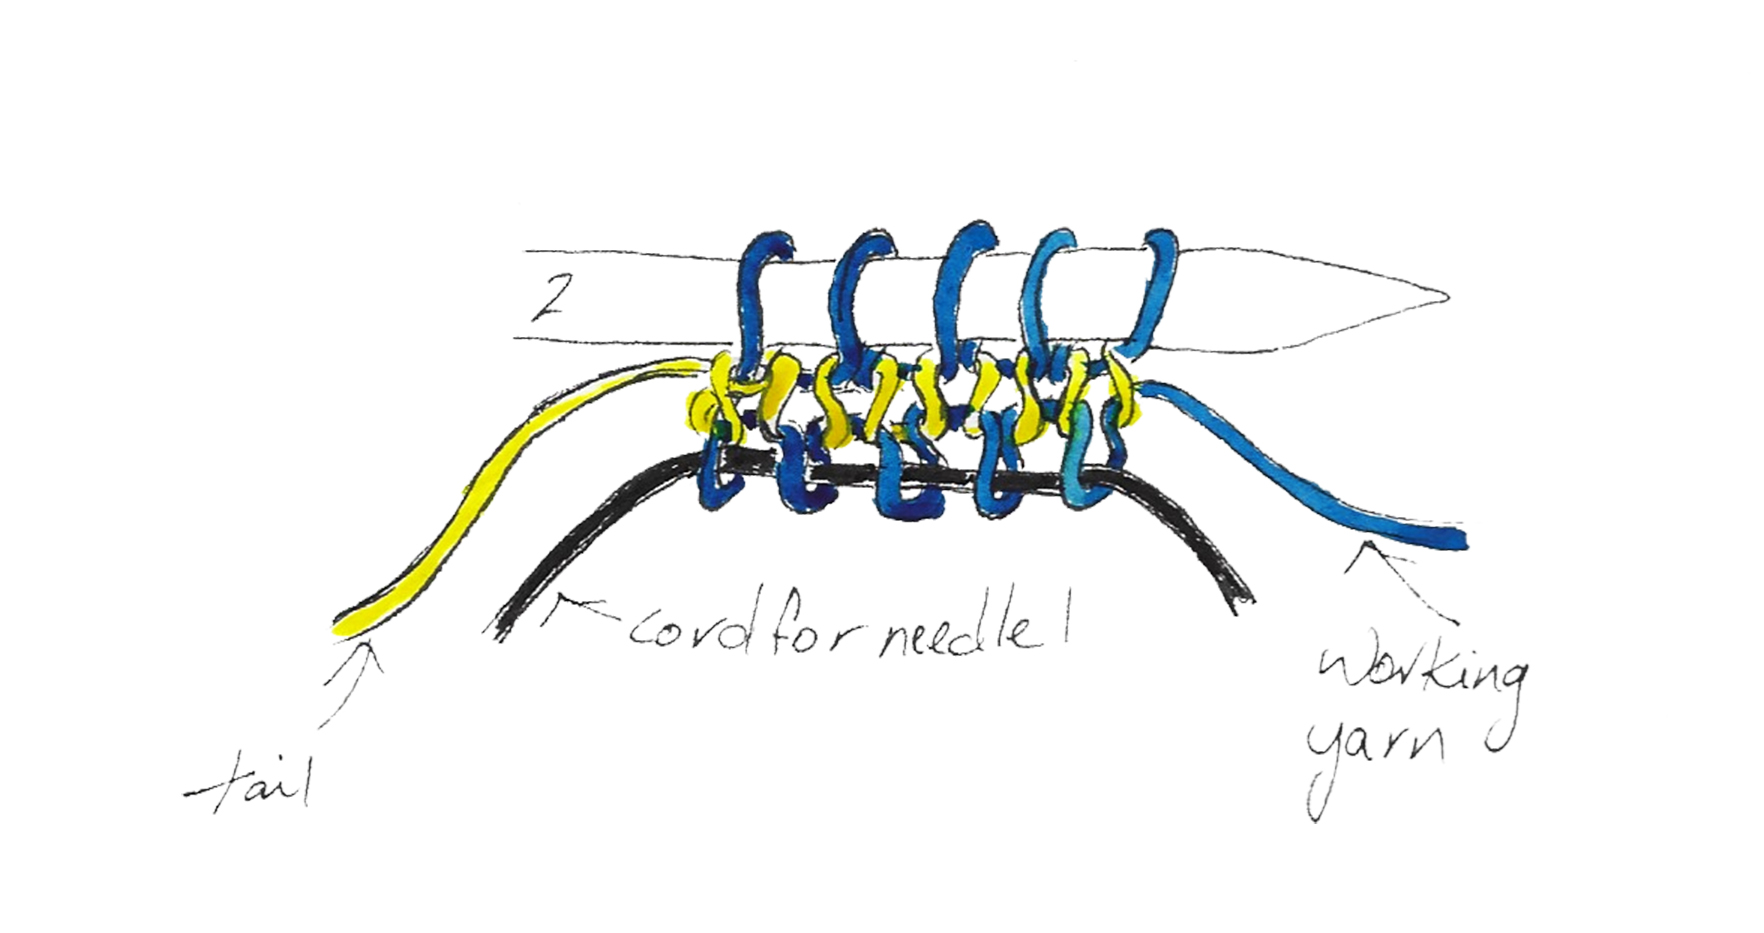
Step 1
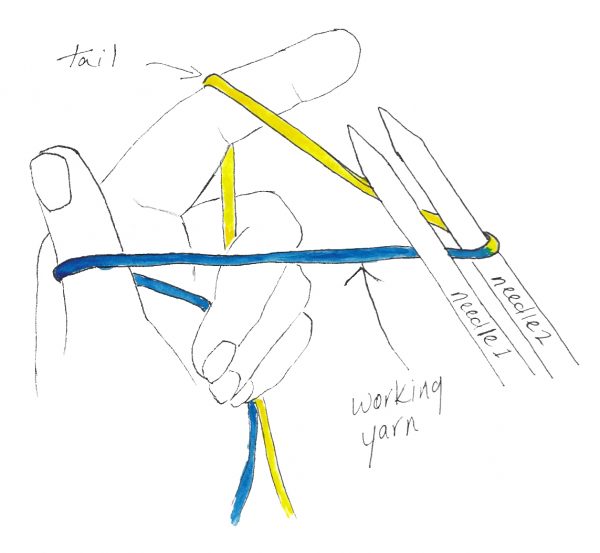
Take one tip from each of two circular needles. Hold the tips together, one (needle 1) below the other (needle 2). Arrange yarn so that the tail comes up over your index finger, over needle 2, between the needles, around your thumb from the outside, and from there over your palm to the ball of yarn. Use your other three fingers to hold the yarn ends firmly.
Step 2

With your index finger, bring the tail behind needle 1, up around the front, and between the needles.
Step 3
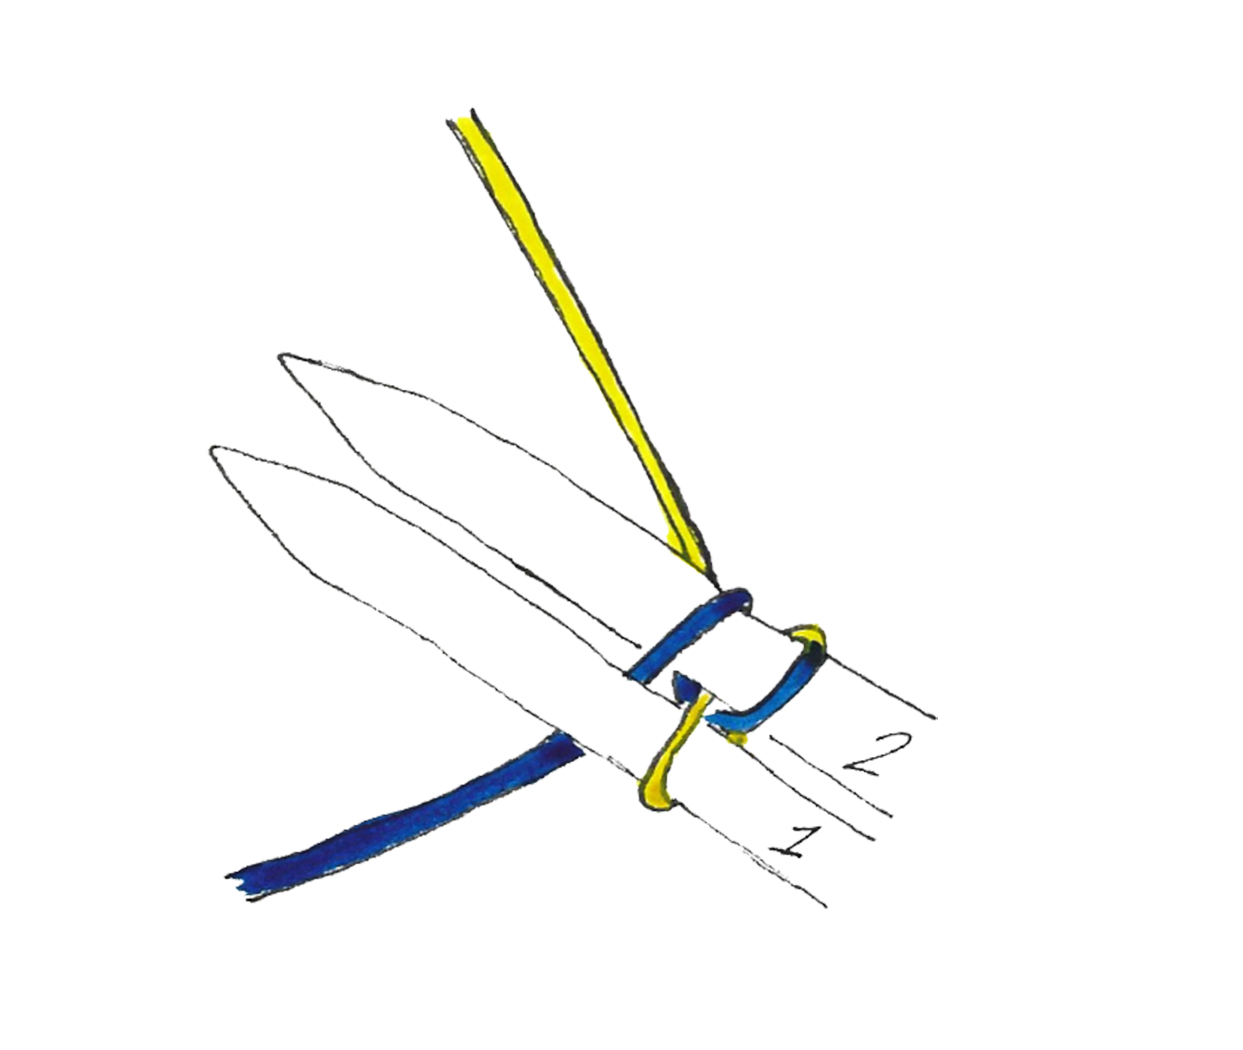
With your thumb, bring the working yarn behind and over needle 2, then back between the needles.
Step 4
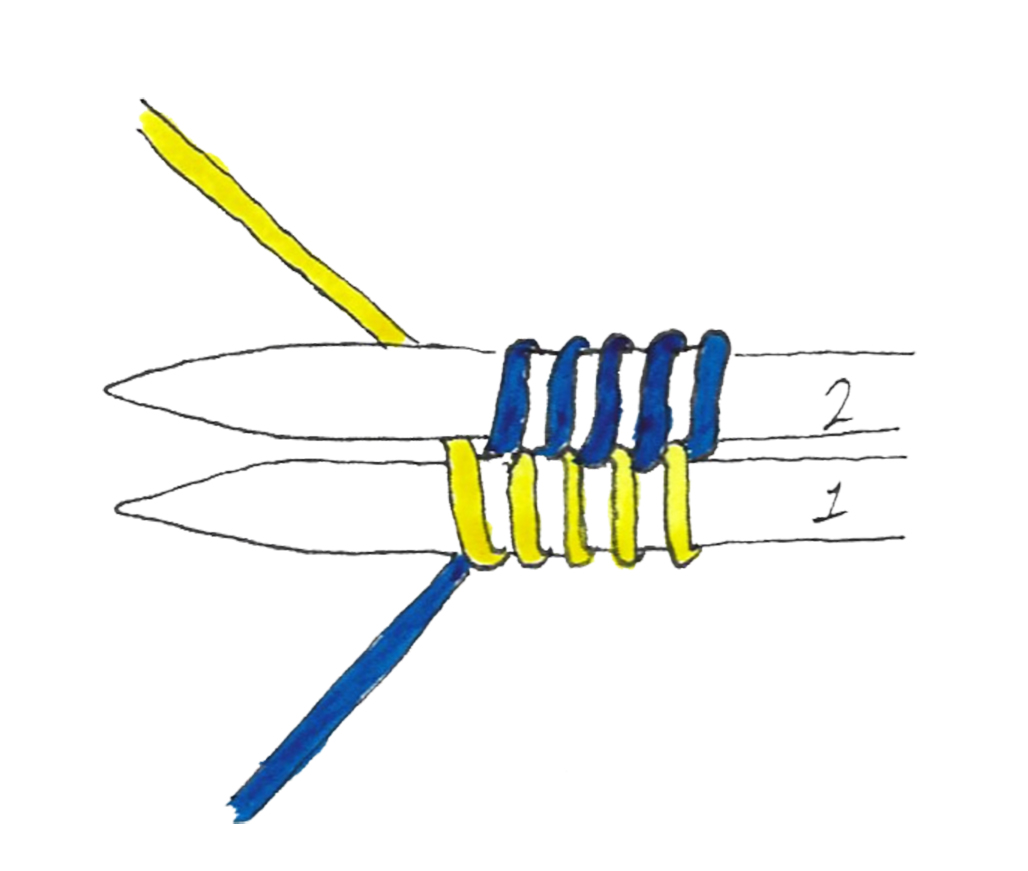
Repeat steps 2 and 3 until you have cast on the desired number of stitches, ending with step 2.
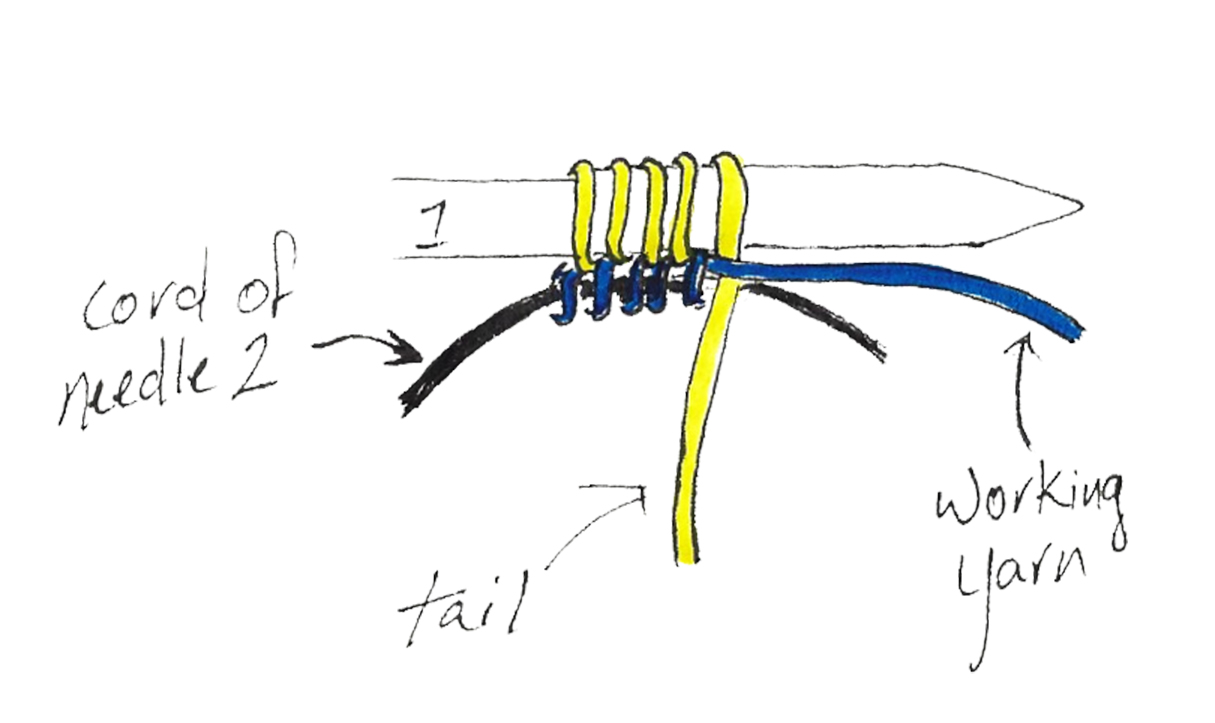
First Round
I usually place my marker after finishing this round.
Turn needles over so that needle 1 is on the top and the tips are pointing to your right. Pull the tip of needle 2 to the right so that the bottom stitches are on the cord. Make sure the tail is between the working yarn and needle 1.
Knit all stitches on needle 1.
Turn needles so that needle 2 is on the top. Pull needle 1 to the right so that its stitches are on the cord, then pull needle 2 to the left so that its stitches are on the needle tip, with the tip pointed to your right.
All the stitches on needle 2 except the first one will be seated backward, so knit the first stitch, then knit the rest of the stitches on needle 2 through the back of the loop.
And that’s it! This cast on is nicely invisible, looking rather like the grafted toe on a cuff-down sock.

Great drawings. I see the family talent hasn’t escaped you.
Thank you!
I love the illustrations! Also, I never make toe up socks, so I should learn this just in case.
Thank you! Ted Beverly mentioned over on Instagram that it makes a great provisional cast on, too, which hadn’t occurred to me.
I purchased this pattern a copy of weeks ago and have run into a snag. The pattern was self explanatory until I reached the “set-up for foot” section. I’ve been using magic loop but the next row doesn’t work, the count is off. JIs there a video?
Hi, Terry. I have not made a video for this tutorial or for the Last Minute Travel Slippers, but I’m sure there are videos for this cast on out there if you look around.
I’m not sure what part of the pattern you’re referring to or why your stitch count might be off. If you could maybe send me a photo and/or a description of where you’re at to elizabeth at eelliottknits dot com (my pattern support email address), I can see what we can do to figure this out.
Hi, I’m also having trouble with the pattern ‘foot setup’ part. I’m doing the large size, so there are 23 stitches on each needle:
Setup for foot: Removing markers as you go, k12 (14, 16), slip last 7 (8, 9) sts worked to holder or scrap yarn, k to end. [27 (32, 37) sts]
The bit I’m confused about is slipping ‘last 9 sts’ onto the scrap yarn and then knitting to the end. It seems odd and a bit confusing to me. Maybe I’m being a bit thick in the head or something, but is that the last on each side or just the first needle?
I’ve done plenty of sock knitting but this is definitely new to me–never did slippers before. Everything else is fine–done the Judy’s cast on loads, as I love toe-up socks and just finished a pair, which also had German short rows (I’m fine with those now, too). Anyway, thanks very much. They are really cute and I am keen to carry on ☺️
Hi Sheria,
This sounds like it’s for the Last Minute Travel Slippers, yes? What you’re doing there is making the gap for the top of the foot, and leaving live stitches to attach the cable panel to later. You’re just making this gap on one side, and then knitting to the end of the round. From here on, you’ll work the remaining stitches flat to the heel, and that flat section will make the sole and sides of the slipper.
I hope that helps! If you’d like to talk about it more or run into other problems, please feel free to email me at elizabeth at eelliottknits dot com and I’ll be happy to walk you through it.
Hi, thanks so much for the quick reply–much appreciated.
Yes, sorry, it is the Last Minute Travel Slippers. I guess I was on the right track all along, but I wasn’t ‘seeing’ it. Thanks again for all your help & hope you have a lovely weekend!
Best wishes,
Sheri (the a was a typo)
So glad that helped! I understand: new-to-you constructions can be tricky, and it can be hard to trust that you understand correctly when you haven’t done the thing before. I have definitely been there.
I hope you have a lovely weekend, too!